Introduction
Hi! Billy Mays here for Intune! Do you have WiFi profiles with errors that’s just annoying? Then you need Automated Azure AD Groups for devices only with a Wireless Network card! Okey with that awesome Billy Mays sponsored intro your probably really excited for what comes next. So a few weeks ago I did this blog post describing how to create Azure AD Groups using Azure Automation and MS Graph based on Intune devices properties
So I actually got a few messages regarding solving Intune WiFi profiles using this method so I decided I can do a use case for the last post. So this post will not go into all the details since they were covered in the last post, please head there to set up the basics. Hence this will be a shorter post than usual
Solution
So I’m not sure how many have this issue or if this perhaps can be solved using Intune Filters? But no matter this will be a neat use case for Azure AD Groups based on Intune Device properties. So once again I’m not going to cover the details for the basic setup here as they are in the last post
So this solution will basically only be the Script that collects the correct device properties and how to set it up in the Azure Automation account. We will use the enterprise application and automation account to collect all devices that register a Wireless Network card and then put them in a Group that will be updated on a regular schedule, then hopefully we will have a WiFi profile without errors

What we need
- An Enterprise Application (We’re going to modify the one we have already)
- We need to be able to authenticate to MS Graph and the correct API calls
- An Azure AD Group
- This is the group we want to maintain and populate with devices
- A Script (We’re going to modify the one we have already)
- The script will be responsible for updating the Azure AD group
- An Azure Automation Account (We’re going to use the one we have already)
- This is where we run the script that updates the Azure AD group
Enterprise Application
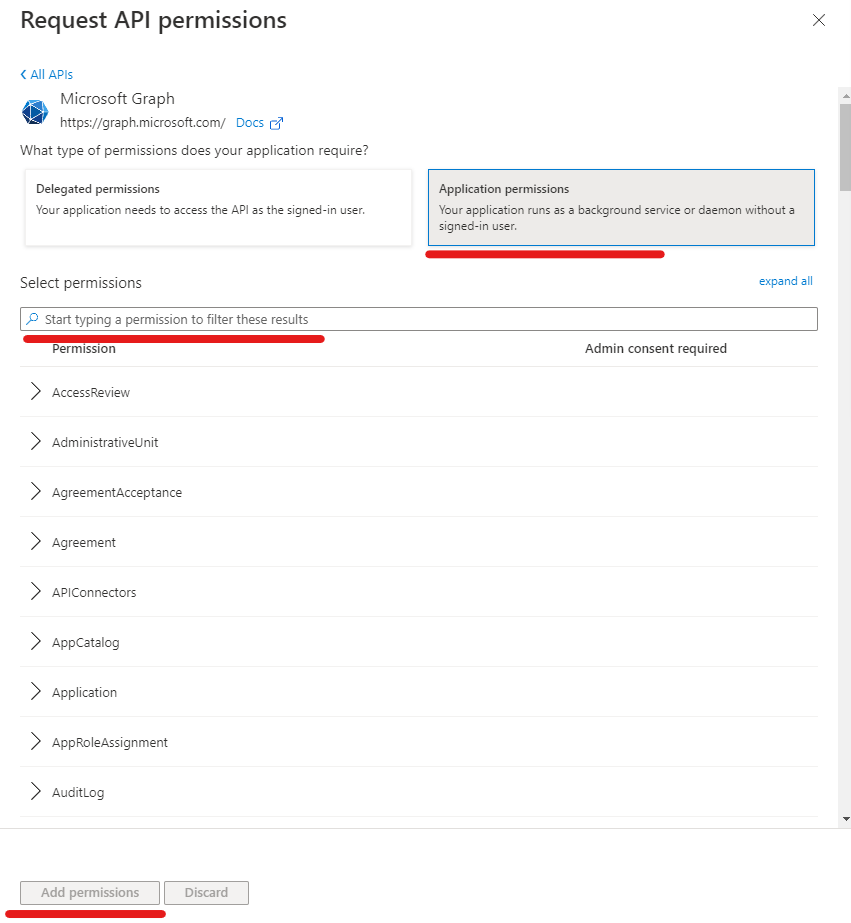
We’re gonna start of with our existing Enterprise Application, we’re going to make sure we have the permissions on the application that we need. So if you set up the same permissions I did in the last post we’re almost all set but we need to add the ability to read devices as we no longer deal with users, but if not we’re going to go through all permissions needed here
- Open Azure AD
- Navigate to App registrations
- Select the Application you Created previously (Note that there are multiple tabs and that if you can’t find your application select “All Applications” and search for it)
- Navigate to the API permissions tab
- Select Add a permission
- Chose Microsoft Graph
- Chose Application permissions
- Search Device.Read.All
- Mark the box for Device.Read.All under Device
- Repeat for permissions: DeviceManagementManagedDevices.Read.All, GroupMember.ReadWrite.All
- Add permissions
- Review that the correct permissions have been granted then Select Grant admin consent for “Tenant”


Azure AD Group
So now we’re gonna head into Azure AD to create our device group which will hold our devices with Wireless Networkcards
- Open Azure AD
- Navigate to the Groups blade
- Select New group
- Select a fitting Name for your group, I chose “WiFi Devices” but it depends on what the purpose of your group will be
- Select membership type Assigned
- Select Create
After the group is done creating, head on over to it and make record of the Object ID

Script
Alright, we have our Azure AD group and the correct permissions on our Enterprise Application we can move forward to the actual script
In the last Post I went through how the API calls to Intune works so I wont do it here, but lets take an image from the last post and look at it:

As we can se on the object we have a property for wiFimacAddress, this seem like a fitting property to use. So we’re simply going to look at each object, and if the Object has a wiFimacAddress, chances are it’s got a Wireless Network card right? And then put the device into our AzureAD Group
We can then go and assign that group to our Intune Profile and Intune wont try to push out WiFi profiles to devices that’s missing a Wireless Network card, simple and easy
Here is our script that will gather the Devices with a network card and then put into our Azure AD group
|
1 2 3 4 5 6 7 8 9 10 11 12 13 14 15 16 17 18 19 20 21 22 23 24 25 26 27 28 29 30 31 32 33 34 35 36 37 38 39 40 41 42 43 44 45 46 47 48 49 50 51 52 53 54 55 56 57 58 59 60 61 62 63 64 65 66 67 68 69 70 71 72 73 74 75 76 77 78 79 80 81 82 83 84 85 86 87 88 89 90 91 92 93 94 95 96 97 98 99 100 101 102 103 104 105 106 107 108 109 110 111 112 113 114 115 116 117 118 119 120 121 122 123 124 125 126 127 128 129 130 131 132 133 134 135 136 137 138 139 140 141 142 143 144 145 146 147 148 149 150 151 152 153 154 155 156 157 158 159 160 161 162 163 164 165 166 167 168 169 170 171 172 173 174 175 176 177 178 179 180 181 182 183 184 185 186 187 188 189 190 191 192 193 194 195 196 197 198 199 200 201 202 203 204 205 206 207 208 209 210 211 212 213 214 215 216 |
############################## # # Viktor Sjögren # https://www.smthwentright.com/ # FileName: XXX.ps1 # ############################## ############################## ## Parameters ############################## ############################## ## Variables ############################## $TenantID = Get-AutomationVariable -Name TenantID $ApplicationID = Get-AutomationVariable -Name IntuneGroupsApplicationID $AppSecret = Get-AutomationVariable -Name IntuneGroupsAppSecret $AADGroupID = Get-AutomationVariable -Name WiFiDevicesID ############################## ## Functions ############################## Function Get-MSGraphAuthToken { [cmdletbinding()] Param( [parameter(Mandatory = $true)] [pscredential]$Credential, [parameter(Mandatory = $true)] [string]$tenantID ) #Get token $AuthUri = "https://login.microsoftonline.com/$TenantID/oauth2/token" $Resource = 'graph.microsoft.com' $AuthBody = "grant_type=client_credentials&client_id=$($credential.UserName)&client_secret=$($credential.GetNetworkCredential().Password)&resource=https%3A%2F%2F$Resource%2F" $Response = Invoke-RestMethod -Method Post -Uri $AuthUri -Body $AuthBody If ($Response.access_token) { return $Response.access_token } Else { Throw "Authentication failed" } } Function Invoke-MSGraphQuery { [CmdletBinding(DefaultParametersetname = "Default")] Param( [Parameter(Mandatory = $true, ParameterSetName = 'Default')] [Parameter(Mandatory = $true, ParameterSetName = 'Refresh')] [string]$URI, [Parameter(Mandatory = $false, ParameterSetName = 'Default')] [Parameter(Mandatory = $false, ParameterSetName = 'Refresh')] [string]$Body, [Parameter(Mandatory = $true, ParameterSetName = 'Default')] [Parameter(Mandatory = $true, ParameterSetName = 'Refresh')] [string]$token, [Parameter(Mandatory = $false, ParameterSetName = 'Default')] [Parameter(Mandatory = $false, ParameterSetName = 'Refresh')] [ValidateSet('GET', 'POST', 'PUT', 'PATCH', 'DELETE')] [string]$method = "GET", [Parameter(Mandatory = $false, ParameterSetName = 'Default')] [Parameter(Mandatory = $false, ParameterSetName = 'Refresh')] [switch]$recursive, [Parameter(Mandatory = $true, ParameterSetName = 'Refresh')] [switch]$tokenrefresh, [Parameter(Mandatory = $true, ParameterSetName = 'Refresh')] [pscredential]$credential, [Parameter(Mandatory = $true, ParameterSetName = 'Refresh')] [string]$tenantID ) $authHeader = @{ 'Accept' = 'application/json' 'Content-Type' = 'application/json' 'Authorization' = "Bearer $Token" } [array]$returnvalue = $() Try { If ($body) { $Response = Invoke-RestMethod -Uri $URI -Headers $authHeader -Body $Body -Method $method -ErrorAction Stop } Else { $Response = Invoke-RestMethod -Uri $URI -Headers $authHeader -Method $method -ErrorAction Stop } } Catch { If (($Error[0].ErrorDetails.Message | ConvertFrom-Json -ErrorAction SilentlyContinue).error.Message -eq 'Access token has expired.' -and $tokenrefresh) { $token = Get-MSGraphAuthToken -credential $credential -tenantID $TenantID $authHeader = @{ 'Content-Type' = 'application/json' 'Authorization' = $Token } $returnvalue = $() If ($body) { $Response = Invoke-RestMethod -Uri $URI -Headers $authHeader -Body $Body -Method $method -ErrorAction Stop } Else { $Response = Invoke-RestMethod -Uri $uri -Headers $authHeader -Method $method } } Else { Throw $_ } } $returnvalue += $Response If (-not $recursive -and $Response.'@odata.nextLink') { Write-Warning "Query contains more data, use recursive to get all!" Start-Sleep 1 } ElseIf ($recursive -and $Response.'@odata.nextLink') { If ($PSCmdlet.ParameterSetName -eq 'default') { If ($body) { $returnvalue += Invoke-MSGraphQuery -URI $Response.'@odata.nextLink' -token $token -body $body -method $method -recursive -ErrorAction SilentlyContinue } Else { $returnvalue += Invoke-MSGraphQuery -URI $Response.'@odata.nextLink' -token $token -method $method -recursive -ErrorAction SilentlyContinue } } Else { If ($body) { $returnvalue += Invoke-MSGraphQuery -URI $Response.'@odata.nextLink' -token $token -body $body -method $method -recursive -tokenrefresh -credential $credential -tenantID $TenantID -ErrorAction SilentlyContinue } Else { $returnvalue += Invoke-MSGraphQuery -URI $Response.'@odata.nextLink' -token $token -method $method -recursive -tokenrefresh -credential $credential -tenantID $TenantID -ErrorAction SilentlyContinue } } } Return $returnvalue } ############################## ## Scriptstart ############################## #Authenticate to Enterprise Application $Credential = New-Object System.Management.Automation.PSCredential($ApplicationID, (ConvertTo-SecureString $AppSecret -AsPlainText -Force)) $Token = Get-MSGraphAuthToken -credential $Credential -TenantID $TenantID #Get all AzureAD devices $ResourceURL = "https://graph.microsoft.com/v1.0/devices" $AzureADDevices = Invoke-MSGraphQuery -method GET -URI $resourceURL -token $token -recursive $AzureADDevices = $AzureADDevices.Value #Get all managed devices $ResourceURL = "https://graph.microsoft.com/v1.0/deviceManagement/managedDevices" $managedDevices = Invoke-MSGraphQuery -method GET -URI $resourceURL -token $token -recursive $managedDevices = $managedDevices.Value #Get all members in our current AAD groups to later be used to compare $ResourceURL = "https://graph.microsoft.com/beta/groups/$AADGroupID/members" $GroupMembers = Invoke-MSGraphQuery -method GET -URI $resourceURL -token $token -recursive $GroupMembers = $GroupMembers.Value Write-Output "$($GroupMembers.count) members in AAD Group" #Sort out all devices thats missing a wiFiMacAddress $WiFiAbleIntuneDevices = $managedDevices | Where-Object { !([string]::IsNullOrEmpty($_.wiFiMacAddress)) } #Get the Azure AD device ID for the WiFiAbleIntuneDevices $AzureADDeviceObjects = @() ForEach ($IntuneDevice in $WiFiAbleIntuneDevices) { $AzureADDeviceObjects += ($AzureADDevices | Where-Object { $_.DeviceID -eq $IntuneDevice.AzureADDeviceID }) } If ([string]::IsNullOrEmpty($GroupMembers.ID)) { $Temp = New-Object System.Object ; $Temp | Add-Member -MemberType NoteProperty -Name "ID" -Value "Temp"; $GroupMembers += $Temp } #Compare the current group members againt our attirubte list $Compare = Compare-Object -ReferenceObject $GroupMembers.ID -DifferenceObject $AzureADDeviceObjects.ID #Add the users to the group ForEach ($Device in $Compare) { $DeviceID = $Device.InputObject #If User is no longer amongst primary intune users but in the group it needs to be removed If ($Device.SideIndicator -eq "<=") { Write-Output "Removing Device with ID $DeviceID" Try { $ResourceURL = "https://graph.microsoft.com/v1.0/groups/$AADGroupID/members/$DeviceID/`$ref" $RemoveDevice = Invoke-MSGraphQuery -method DELETE -URI $resourceURL -token $token -Body $body } Catch { Write-Warning "Error occured with removing device ID: $DeviceID" } } #If the user is not in the group but is a primary intune user it needs to be added If ($Device.SideIndicator -eq "=>") { Write-Output "Adding Device with ID $($DeviceID)" $Body = @{ "@odata.id"="https://graph.microsoft.com/v1.0/directoryObjects/$DeviceID" } | ConvertTo-Json Try { $ResourceURL = "https://graph.microsoft.com/v1.0/groups/$AADGroupID/members/`$ref" $AddDevice = Invoke-MSGraphQuery -method POST -URI $resourceURL -token $token -Body $body } Catch { Write-Warning "Error occured with adding device ID: $DeviceID" } } } |
Automation Account
Onwards to the next part in our solution, the Automation Account. The Automation Account will add Azure capacity and therefore cost, however, Automation includes 500 minutes of free processing time and we will be able to use those to not add cost depending on how often you want to run your scripts. If you want to know more about costs in Azure feel free to check it out using Azure Calculator
We’re not going to use the Automation account we created in our previous post please head over there if you haven’t got one set up
When the Automation Account is finished creating we can now head into it to Upload our Script & Create our Variables
So first we’re gonna create our Variables for the script, one of the cool things about an Automation Account is you can create variables for your script Outside of the script and then import that variable into any script in your Automation Account. So that’s what we’re gonna start off doing with our Enterprise Application information
- Select the blade Variables
- Select Add a variable
- Now we get to name our Variable, this name must reflect the name of the Variable we import in the script. You can chose differently from what I chose as long as you update those values in the Script.
- Enter the name TenantID and the type String and the Value we collected earlier
- Enter the name IntuneGroupsApplicationID (or another fitting prefix for your ApplicationID, but if you change this it must be changed in the script as well) variable and the type String and the Value we collected earlier
- Enter the name IntuneGroupsAppSecret (or another fitting prefix for your AppSecret, but if you change this it must be changed in the script as well) variable and the type String and the Value we collected earlier, on this Variable chose Encrypted “Yes“
So thats the Enterprise Application variables added, now we just need a variable for the Azure AD Group, we made note of the Object ID earlier
- Select Add a variable
- Enter the name WiFiDevicesID (or another fitting prefix for your Azure AD Group, but if you change this it must be changed in the script as well) and the type String and the Object ID we collected earlier

Now with our Variables done we can head onto uploading the script.
- Select the blade Runbooks
- Select Create a runbook
- Select a fitting Name for your Automation Account, I chose “ManageIntuneGroup-WiFiDevices” but it doesn’t matter
- For Runbook type select Powershell and for Runtime version select 5.1 (As the time of writing this 7.1 is still in preview and untested by me but if you want to use 7.1 it will probably work just as well), Enter any description you want then select Create
- When faced with the blank canvas we can now paste in our script, we do not need to change anything since the variables that we normally would need to change will be imported from the Automation Account unless you made changes to the Variable names
- Save & Publish
So that’s about it, now you can hook it up to a Schedule based on how often you want it to run I suggest running it once every hour for new devices to be added fairly quickly
Trying it out
Trying it out is really simple, you can wait for the first run or you can head to the overview page and hit Start to run it now
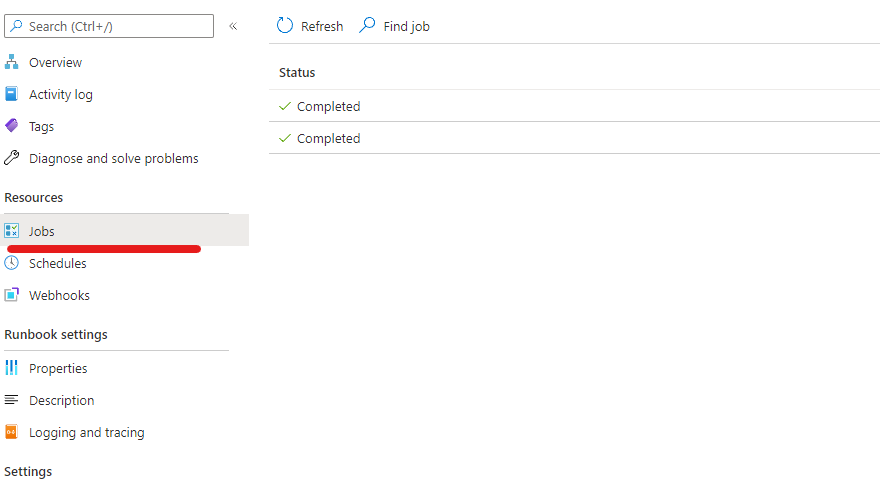
Select the blade Jobs in your Automation Account and you should see it as Completed or Running, hopefully not failed. If you enter the Job you can view the logs and see what’s going on. Once you clicked on the Job you can select the All Logs tab and the table shows all the details

After the job is run you should see your Azure AD group getting populated!
Done!
Further
As always I would love if anyone comes up with ways to improve this. Since this is just an example of a use case I think the ways to improve & go further upon this are many! I also think there are a lot of great idea that people come up with using a solution like this, creating many different type of groups for different purposes, I’d love if people wanted to share. If there is anyone who wants me to post that solution I can do an update to this. I would be ever so grateful for feedback, comments or ideas how to improve upon this further
Thanks for reading