Introduction
Intune/Endpoint Manager has been one of the best device management tools for a few years now and a lot of businesses has already migrated to or started to make us of it. But there are still plenty of businesses that are using others tools and is planning a move to Intune and Azure AD Joined devices and would like to upload all their devices to Autopilot before reinstalling their clients and are looking for a easy way to get all of their devices into Autopilot.
Solution
As with a lot of things there are multiple ways to go about solving an issue and and I’m by no way saying this is the best way of accomplishing an autopilot import but today we are focusing on doing this as automatically as possible for as many devices as we need to. Nicolaj over at ConfigMgr amongst others has different ways of achieving this as well and has inspired this solution.
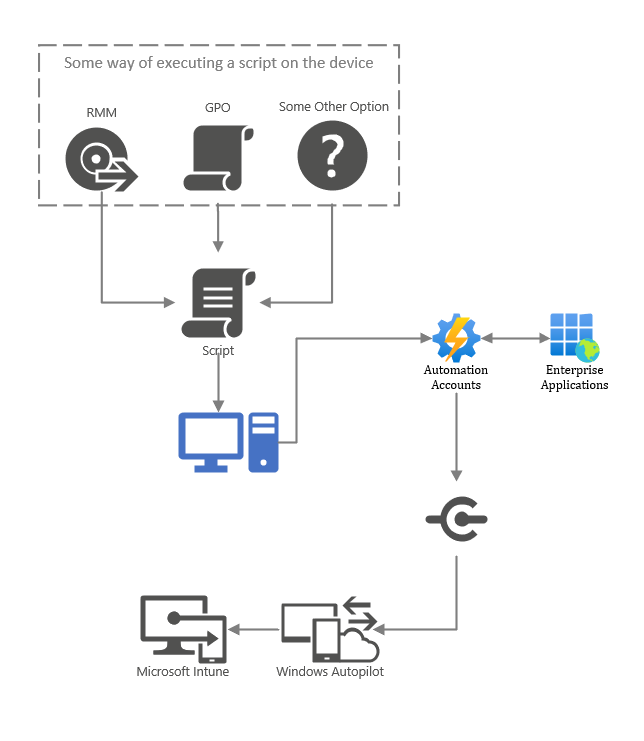
So the goal is to collect the hardware hashes for each device using a script and then get it imported to Autopilot with the ultimate goal of Autopilot creating a better deployment to Intune for Azure AD Joined devices when we reinstall them.
To explain how we are going to get there we’re going to utilize MS Graph & an Azure Automation Account and some way to run a script on the devices(GPO, RMM or otherwise). The script will collect the hardware hash and using a webhook in it will push the information to the Automation Account and then using MS Graph it will import it into Autopilot.
Since my last lackluster Visio Sketch was such a hit I will provide a new lackluster sketch to visualize this:
Note: As a reader pointed out this solution is focused on getting existing clients into Autopilot, for new devices it’s recommended to purchase that service from an OEM or Microsoft Autopilot partner
What we need
- An Enterprise Application
- We need to be able to import & sync our devices to Autopilot
- An Azure Automation Account
- Here we receive the Hardware hash from the devices through a webhook and then using MS Graph import it into Autopilot
- A Script to run on the device
- The script will run on the device to collect the hardware hash and post it to the Automation Account. Modify the variables for different group tags / order id’s you want to use in Autopilot
- Some way of executing the script on the device
Enterprise Application
Firstly we need the Enterprise application, this will be used to authenticate against MS Graph in order to import a device into & sync Autopilot.
- Open Azure AD
- Navigate to App registrations
- Select New registration
- Select Accounts in this organizational directory only
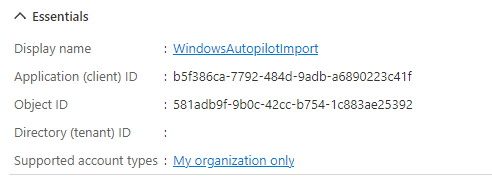
- Select a fitting Name for your application, I chose “WindowsAutopilotImport” but it doesn’t matter
- Register
When the Application is finished creating we need to make Note of the Application ID and the Tenant ID visible on the Overview tab
Now we need to assign the permissions we need for the Application to be able to import a device into Autopilot & then trigger an Autopilot sync.
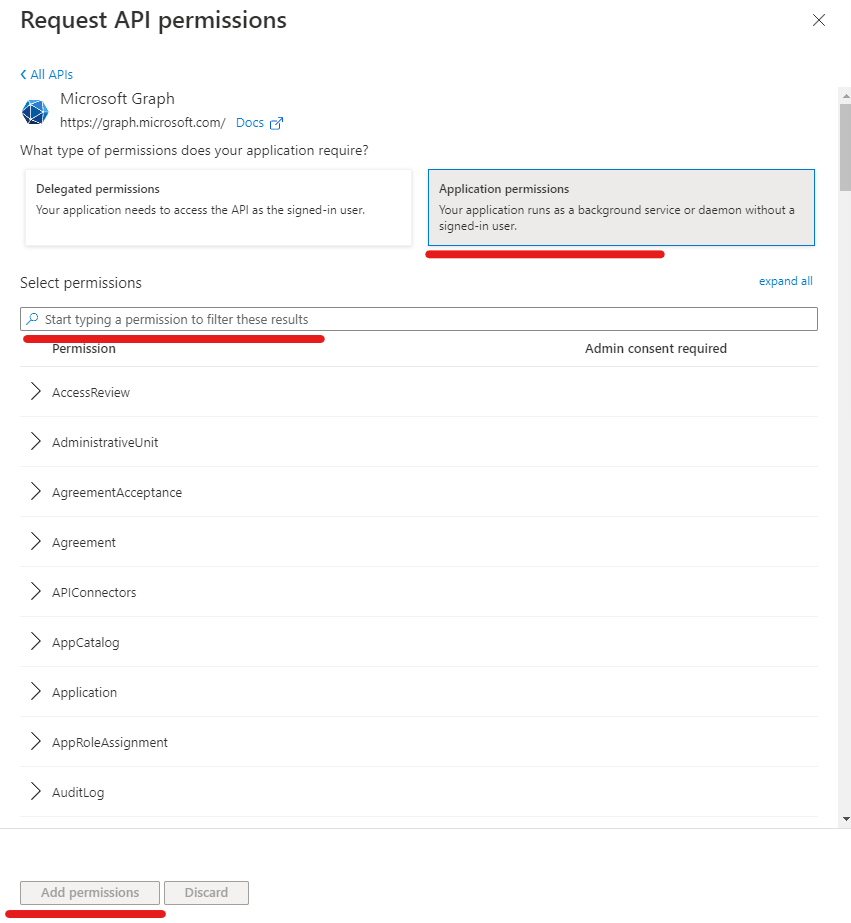
Navigate to the API permissions tab
- Select Add a permission
- Chose Microsoft Graph
- Chose Application permissions
- Search DeviceManagementServiceConfig.ReadWrite.All
- Mark the box for DeviceManagementServiceConfig.ReadWrite.All under DeviceManagementServiceConfig
- Add permissions
- Review that the correct permissions have been granted then Select Grant admin consent for “Tenant”


Now we just need to create a way for us to authenticate against the Application, navigate to the Certificates & secrets tab
- Make sure you have Client secrets highlighted
- Select New client secret
- Type a descriptive name for the secret and select an expiration, I chose 12 months and entered “WindowsAutopilotImport” in the description but it doesn’t matter
- Add
- Make note of the Value, Secret ID, Description & Expiration date
- This will be the only time the Value is visible, after leaving this tab the secret is gone forever
- Enter the information in e.g a Password manager solution for safe keeping
Automation Account
Onwards to the next part in our solution, the Automation Account. The Automation Account will add Azure capacity and therefore cost, however, Automation includes 500 minutes of free processing time and we will be able to use those to not add cost. If you want to know more about costs in Azure feel free to check it out using Azure Calculator.
First we’re going to start by creating our Automation Account that will house our script. If you already have an Automation Account feel free to use that and skip this bit.
Creating the Automation Account
- Start off by searching for Automation Account in Azure
- Select Create
- Chose a fitting Subscription, Resource Group, and Region
- Select a fitting Name for your Automation Account, I chose “IntuneAutomation” but it doesn’t matter
- For Managed Identities’ we can uncheck both boxes
- Under Networking you can chose whatever supports your infrastructure, recommended to have Private Access but for this instance I chose “Public Access”
- Go through the rest of the tabs at your own preference and then Create
When the Automation Account is finished creating we can now head into it to Upload our Script & Create our Variables
So first we’re gonna create our Variables for the script, one of the cool things about an Automation Account is you can create variables for your script Outside of the script and then import that variable into any script in your Automation Account. So that’s what we’re gonna start off doing with our Enterprise Application information.
- Select the blade Variables
- Select Add a variable
- Now we get to name our Variable, this name must reflect the name of the Variable we import in the script. You can chose differently from what I chose as long as you update those values in the Script.
- Enter the name TenantID and the type String and the Value we collected earlier
- Enter the name WindowsAutopilotImportApplicationID and the type String and the Value we collected earlier
- Enter the name WindowsAutopilotImportAppSecret and the type String and the Value we collected earlier, on this Variable chose Encrypted “Yes“
- Enter the name AutopilotWebhookPassword and the type String and for Value generate a strong string / password some way and input it here, remember it because we need it for later, on this Variable chose Encrypted “Yes“

Now with our Variables done we can head onto uploading the script.
- Select the blade Runbooks
- Select Create a runbook
- Select a fitting Name for your Automation Account, I chose “CreateWindowsAutopilotDevice” but it doesn’t matter
- For Runbook type select Powershell and for Runtime version select 5.1 (As the time of writing this 7.1 is still in preview and untested by me but if you want to use 7.1 it will probably work just as well), Enter any description you want then select Create
- When faced with the blank canvas we can now paste in our script, we do not need to change anything since the variables that we normally would need to change will be imported from the Automation Account
- Save & Publish
|
1 2 3 4 5 6 7 8 9 10 11 12 13 14 15 16 17 18 19 20 21 22 23 24 25 26 27 28 29 30 31 32 33 34 35 36 37 38 39 40 41 42 43 44 45 46 47 48 49 50 51 52 53 54 55 56 57 58 59 60 61 62 63 64 65 66 67 68 69 70 71 72 73 74 75 76 77 78 79 80 81 82 83 84 85 86 87 88 89 90 91 92 93 94 95 96 97 98 99 100 101 102 103 104 105 106 107 108 109 110 111 112 113 114 115 116 117 118 119 120 121 122 123 124 125 126 127 128 129 130 131 132 133 134 135 136 137 138 139 140 141 142 143 144 145 146 147 148 149 150 151 152 153 154 155 156 157 158 159 160 161 162 163 164 165 166 167 168 169 170 171 172 173 174 175 176 177 178 179 180 181 182 183 184 185 186 187 188 189 190 191 192 193 194 195 196 197 198 199 200 201 202 203 204 205 206 207 208 209 210 211 212 213 214 215 216 217 218 219 220 221 222 223 224 225 226 227 228 229 230 231 232 233 234 235 236 237 238 239 240 241 242 243 244 245 246 247 248 249 250 251 252 253 254 255 256 257 258 259 260 261 262 263 264 265 266 267 268 269 270 271 272 273 274 275 276 277 278 279 280 281 282 283 284 285 286 287 288 289 290 291 292 293 294 295 296 297 298 299 300 301 302 303 304 305 306 307 308 309 310 311 |
############################## # # Viktor Sjögren # https://www.smthwentright.com/ # FileName: XXX.ps1 # ############################## ############################## ## Parameters ############################## [CmdletBinding()] Param ([object]$WebhookData) #this parameter name needs to be called WebHookData otherwise the webhook does not work as expected. $VerbosePreference = 'Continue' ############################## ## Variables ############################## $TenantID = Get-AutomationVariable -Name 'TenantID' $ApplicationID = Get-AutomationVariable -Name 'WindowsAutopilotImportApplicationID' $AppSecret = Get-AutomationVariable -Name 'WindowsAutopilotImportAppSecret' $WebhookPassword = Get-AutomationVariable -Name 'AutopilotWebhookPassword' ############################## ## Functions ############################## Function Get-MSGraphAuthToken { [cmdletbinding()] Param( [parameter(Mandatory = $true)] [pscredential]$Credential, [parameter(Mandatory = $true)] [string]$tenantID ) #Get token $AuthUri = "https://login.microsoftonline.com/$TenantID/oauth2/token" $Resource = 'graph.microsoft.com' $AuthBody = "grant_type=client_credentials&client_id=$($credential.UserName)&client_secret=$($credential.GetNetworkCredential().Password)&resource=https%3A%2F%2F$Resource%2F" $Response = Invoke-RestMethod -Method Post -Uri $AuthUri -Body $AuthBody If ($Response.access_token) { return $Response.access_token } Else { Throw "Authentication failed" } } Function Invoke-MSGraphQuery { [CmdletBinding(DefaultParametersetname = "Default")] Param( [Parameter(Mandatory = $true, ParameterSetName = 'Default')] [Parameter(Mandatory = $true, ParameterSetName = 'Refresh')] [string]$URI, [Parameter(Mandatory = $false, ParameterSetName = 'Default')] [Parameter(Mandatory = $false, ParameterSetName = 'Refresh')] [string]$Body, [Parameter(Mandatory = $true, ParameterSetName = 'Default')] [Parameter(Mandatory = $true, ParameterSetName = 'Refresh')] [string]$token, [Parameter(Mandatory = $false, ParameterSetName = 'Default')] [Parameter(Mandatory = $false, ParameterSetName = 'Refresh')] [ValidateSet('GET', 'POST', 'PUT', 'PATCH', 'DELETE')] [string]$method = "GET", [Parameter(Mandatory = $false, ParameterSetName = 'Default')] [Parameter(Mandatory = $false, ParameterSetName = 'Refresh')] [switch]$recursive, [Parameter(Mandatory = $true, ParameterSetName = 'Refresh')] [switch]$tokenrefresh, [Parameter(Mandatory = $true, ParameterSetName = 'Refresh')] [pscredential]$credential, [Parameter(Mandatory = $true, ParameterSetName = 'Refresh')] [string]$tenantID ) $authHeader = @{ 'Accept' = 'application/json' 'Content-Type' = 'application/json' 'Authorization' = "Bearer $Token" } [array]$returnvalue = $() Try { If ($body) { $Response = Invoke-RestMethod -Uri $URI -Headers $authHeader -Body $Body -Method $method -ErrorAction Stop -ContentType "application/json" } Else { $Response = Invoke-RestMethod -Uri $URI -Headers $authHeader -Method $method -ErrorAction Stop } } Catch { If (($Error[0].ErrorDetails.Message | ConvertFrom-Json -ErrorAction SilentlyContinue).error.Message -eq 'Access token has expired.' -and $tokenrefresh) { $token = Get-MSGraphAuthToken -credential $credential -tenantID $TenantID $authHeader = @{ 'Content-Type' = 'application/json' 'Authorization' = $Token } $returnvalue = $() If ($body) { $Response = Invoke-RestMethod -Uri $URI -Headers $authHeader -Body $Body -Method $method -ErrorAction Stop } Else { $Response = Invoke-RestMethod -Uri $uri -Headers $authHeader -Method $method } } Else { Throw $_ } } $returnvalue += $Response If (-not $recursive -and $Response.'@odata.nextLink') { Write-Warning "Query contains more data, use recursive to get all!" Start-Sleep 1 } ElseIf ($recursive -and $Response.'@odata.nextLink') { If ($PSCmdlet.ParameterSetName -eq 'default') { If ($body) { $returnvalue += Invoke-MSGraphQuery -URI $Response.'@odata.nextLink' -token $token -body $body -method $method -recursive -ErrorAction SilentlyContinue } Else { $returnvalue += Invoke-MSGraphQuery -URI $Response.'@odata.nextLink' -token $token -method $method -recursive -ErrorAction SilentlyContinue } } Else { If ($body) { $returnvalue += Invoke-MSGraphQuery -URI $Response.'@odata.nextLink' -token $token -body $body -method $method -recursive -tokenrefresh -credential $credential -tenantID $TenantID -ErrorAction SilentlyContinue } Else { $returnvalue += Invoke-MSGraphQuery -URI $Response.'@odata.nextLink' -token $token -method $method -recursive -tokenrefresh -credential $credential -tenantID $TenantID -ErrorAction SilentlyContinue } } } Return $returnvalue } ############################## ## Scriptstart ############################## If ($WebHookData.RequestHeader.message -eq $WebhookPassword) { Write-Output "Webhook authenticated" } else { Write-Output "Got Unauthenticated Request" -ErrorAction Stop Exit 1001 } If ($WebHookData) { # Collect properties of WebhookData $WebhookName = $WebHookData.WebhookName $WebhookHeaders = $WebHookData.RequestHeader $WebhookBody = $WebHookData.RequestBody # Collect individual headers. Input converted from JSON. $From = $WebhookHeaders.From $Input = (ConvertFrom-Json -InputObject $WebhookBody) Write-Verbose "WebhookBody: $Input" Write-Output -InputObject ('Runbook started from webhook {0} by {1}.' -f $WebhookName, $From) } Else { Write-Error -Message 'Runbook was not started from Webhook' -ErrorAction Stop } #Format the input data and post it into the data stream $DeviceHashData = $Input.DeviceHashData $SerialNumber = $Input.SerialNumber $ProductKey = $Input.ProductKey $GroupTag = $Input.GroupTag Write-Output "Posting Input Data" $DeviceHashData $SerialNumber $ProductKey $GroupTag #Getting rid of formatting errors $DeviceHashData = $DeviceHashData -creplace "rn", "rrnn" -creplace "RN", "RRNN" -creplace "Rn", "RRnn" -creplace "rN", "rrNN" $SerialNumber = $SerialNumber -creplace "rn", "rrnn" -creplace "RN", "RRNN" -creplace "Rn", "RRnn" -creplace "rN", "rrNN" $ProductKey = $ProductKey -creplace "rn", "rrnn" -creplace "RN", "RRNN" -creplace "Rn", "RRnn" -creplace "rN", "rrNN" $GroupTag = $GroupTag -creplace "rn", "rrnn" -creplace "RN", "RRNN" -creplace "Rn", "RRnn" -creplace "rN", "rrNN" #Build a json for the creating of the autopilot device Write-Output "Constructing required JSON body based upon parameter input data for device hash upload" $AutopilotDeviceIdentity = [ordered]@{ '@odata.type' = '#microsoft.graph.importedWindowsAutopilotDeviceIdentity' 'groupTag' = if ($GroupTag) { "$($GroupTag)" } else { "" } 'serialNumber' = "$($SerialNumber)" 'productKey' = if ($ProductKey) { "$($ProductKey)" } else { "" } 'hardwareIdentifier' = "$($DeviceHashData)" 'assignedUserPrincipalName' = if ($UserPrincipalName) { "$($UserPrincipalName)" } else { "" } 'state' = @{ '@odata.type' = 'microsoft.graph.importedWindowsAutopilotDeviceIdentityState' 'deviceImportStatus' = 'pending' 'deviceRegistrationId' = '' 'deviceErrorCode' = 0 'deviceErrorRNName' = '' } } #Getting rid of formatting errors and converting to json $AutopilotDeviceIdentityJSON = $($($AutopilotDeviceIdentity | ConvertTo-Json) -replace "rn", "" -replace " ", "") Write-Output $AutopilotDeviceIdentityJSON $Credential = New-Object System.Management.Automation.PSCredential($ApplicationID, (ConvertTo-SecureString $AppSecret -AsPlainText -Force)) $Token = Get-MSGraphAuthToken -credential $Credential -TenantID $TenantID Write-Output "Retrieving all azure Devices" $resourceURL = "https://graph.microsoft.com/beta/deviceManagement/windowsAutopilotDeviceIdentities" $ExistingAutpilotDevices = Invoke-MSGraphQuery -method GET -URI $resourceURL -token $token -recursive #Checking if device already exists in autopilot If ($ExistingAutpilotDevices.Value.SerialNumber -contains $SerialNumber) { Write-Output "Device already in Autopilot, Exiting" Exit 0 } Try { #Import the device into Autopilot Write-Output "Attempting to post data for hardware hash upload" $resourceURL = "https://graph.microsoft.com/beta/deviceManagement/importedWindowsAutopilotDeviceIdentities" Invoke-MSGraphQuery -method POST -URI $resourceURL -token $token -Body $AutopilotDeviceIdentityJSON Write-Output "Web Request Sent" } catch [System.Exception] { $_.Exception.Message Write-Output "Failed to create Autopilot device" } #Does this look like trash to you? Start-Sleep -Seconds 15 $DeviceStatus = $null $ImportStatus = $null Try { #Sync Autopilot $resourceURL = "https://graph.microsoft.com/beta/deviceManagement/windowsAutopilotSettings/sync" Invoke-MSGraphQuery -method POST -URI $resourceURL -token $token Write-Output "Sync Request Sent" } catch [System.Exception] { $_.Exception.Message Write-Output "Failed to Sync Autopilot" } #Verify that the device as been uploaded, if not try again up to 5 times before throwing an error For ($i = 1; $i -lt 5; $i++) { Write-Output "Verifying Status of Autopilot Import" If ($i -ge 5) { Write-Error "Autopilot Import Error" Throw "Autopilot Import Error" Exit 1001 } $resourceURL = "https://graph.microsoft.com/beta/deviceManagement/importedWindowsAutopilotDeviceIdentities" $GetImportedIdentity = Invoke-MSGraphQuery -method GET -URI $resourceURL -token $token -recursive $CurrentImport = $GetImportedIdentity.value | Where-Object { $_.Serialnumber -like $SerialNumber } If ($CurrentImport.State.deviceImportStatus -eq "complete") { Write-Output "Import job Status complete"; $ImportStatus = 1 } $resourceURL = "https://graph.microsoft.com/beta/deviceManagement/windowsAutopilotDeviceIdentities" $GetDeviceIdentity = Invoke-MSGraphQuery -method GET -URI $resourceURL -token $token -recursive #$GetDeviceIdentity.value If ($GetDeviceIdentity.value | Where-Object { $_.Serialnumber -like $SerialNumber }) { Write-Output "Autopilot Device Found"; $DeviceStatus = 1 } If (($DeviceStatus -eq 1) -and ($ImportStatus -eq 1)) { Start-Sleep -Seconds 20 Try { $resourceURL = "https://graph.microsoft.com/beta/deviceManagement/windowsAutopilotSettings/sync" Invoke-MSGraphQuery -method POST -URI $resourceURL -token $token Write-Output "Sync Request Sent" } catch [System.Exception] { $_.Exception.Message Write-Output "Failed to create Autopilot device" } Write-Output "Autopilot Import Completed Successfully" Exit 0 } Start-Sleep -Seconds 100 } Exit 0 |
Now we have the Script all done with the right permissions to complete the tasks we want it to, now we also need a way to trigger it.
- Enter the runbook you just created
- Select the blade Webhooks
- Select Add Webhook
- Select Create new webhook
- Select a fitting Name for your webhook, I chose “WindowsAutopilotImport” but it doesn’t matter
- Select how long you want it to be enabled for, I chose the same as my secret in the Enterprise Application, 12 months.
- Make note of the URL
- This will be the only time the URL is visible, after leaving this tab the URL is gone forever
- Enter the URL in e.g a Password manager solution for safe keeping
- Select OK
- Select Configure parameters and run settings
- Make sure its set to Run on Azure
- Select OK
- Select Create
Hardware hash uploading script
The final part of this solution is to construct the script that will run on the devices that will collect the hardware hashes and then post them to the Webhook we just created. The script is really simple, it collects the SerialNumber, DeviceHashData & ProductKey and then posts it.
The script needs to be run elevated, either as system or as an administrator then it just needs to be edited on a few lines in order to get it running
- GroupTag (Line 18) should reflect whatever Group Tag you want for your device in Autopilot, if you want to leave it blank also comment out Line 60
- WebHookUrl (Line 19) is the Webhook URL we saved earlier
- WebhookPassword (Line 20) should be the WebhookPassword we generated earlier
|
1 2 3 4 5 6 7 8 9 10 11 12 13 14 15 16 17 18 19 20 21 22 23 24 25 26 27 28 29 30 31 32 33 34 35 36 37 38 39 40 41 42 43 44 45 46 47 48 49 50 51 52 53 54 55 56 57 58 59 60 61 62 63 64 65 66 67 68 69 70 71 72 73 74 75 76 77 78 |
############################## # # Viktor Sjögren # https://www.smthwentright.com/ # FileName: XXX.ps1 # ############################## ############################## ## Parameters ############################## ############################## ## Variables ############################## $GroupTag = "Enter a Group Tag here" $WebHookUrl = 'Enter the Webhook URL' $WebhookPassword = 'Enter the Webhook Password' $WindirTemp = Join-Path $Env:Windir -Childpath "Temp" $UserTemp = $Env:Temp $UserContext = [Security.Principal.WindowsIdentity]::GetCurrent() Switch ($UserContext) { { $PSItem.Name -Match "System" } { Write-Output "Running as System" ; $Temp = $UserTemp } { $PSItem.Name -NotMatch "System" } { Write-Output "Not running System" ; $Temp = $WindirTemp } Default { Write-Output "Could not translate Usercontext" } } $logfilename = "AutopilotDeviceUpload" $logfile = Join-Path $Temp -Childpath "$logfilename.log" $LogfileSizeMax = 100 ############################## ## Functions ############################## ############################## ## Scriptstart ############################## If ($logfilename) { If (((Get-Item -ErrorAction SilentlyContinue $logfile).length / 1MB) -gt $LogfileSizeMax) { Remove-Item $logfile -Force } Start-Transcript $logfile -Append | Out-Null Get-Date } Write-Output "Gather device hash data from local machine" $DeviceHashData = (Get-WmiObject -Namespace "root/cimv2/mdm/dmmap" -Class "MDM_DevDetail_Ext01" -Filter "InstanceID='Ext' AND ParentID='./DevDetail'" -Verbose:$false).DeviceHardwareData $SerialNumber = (Get-WmiObject -Class "Win32_BIOS" -Verbose:$false).SerialNumber $ProductKey = (Get-WmiObject -Class "SoftwareLicensingService" -Verbose:$false).OA3xOriginalProductKey $body = @{ "ProductKey" = "$ProductKey"; "SerialNumber" = "$SerialNumber"; "DeviceHashData" = "$DeviceHashData"; "GroupTag" = "$GroupTag"; } If (!($body.SerialNumber)) { Write-Output "No SerialNumber, Exiting"; Exit 1001 } If (!($body.GroupTag)) { Write-Output "No GroupTag, Exiting"; Exit 1001 } If (!($body.DeviceHashData)) { Write-Output "No DeviceHashData, Exiting"; Exit 1001 } If (!($body.ProductKey)) { Write-Output "No ProductKey, Exiting"; Exit 1001 } $params = @{ ContentType = 'application/json' Headers = @{ 'from' = 'AutoPilotDeviceInfo'; 'Date' = "$(Get-Date)"; 'message' = $WebhookPassword } Body = ($body | convertto-json) Method = 'Post' URI = $webhookurl } Invoke-RestMethod @params -Verbose Write-Output "Autopilot info successfully sent" If ($logfilename) { Stop-Transcript | Out-Null } |
Trying it out
Trying it out is really simple, just launch an elevated PowerShell console on any device you want to Import and run the Upload script. Once the script is ran you should be able to se the job created in the Automation Account.
Select the blade Jobs in your Automation Account and you should see it as Completed or Running, hopefully not failed. If you enter the Job you can view the logs and see what’s going on. Once you clicked on the Job you can select the All Logs tab and the table shows all the details


As you can see it takes a few minutes to verify the device has been imported successfully and then we get to see at the last row that it has. If there is anything that prevents it it should generate and error and you would be able to see the job has failed.
After the job has been ran we should now be able to find our device in Windows Autopilot!
Head over to Endpoint Manager & Autopilot and you should be able to find it there.

Done!
Further
As always I would love if anyone comes up with ways to improve this. There is a clear way to improve this with including a check in the device upload script to check if the device has already been imported to autopilot if you are running the script on the same device multiple times. I just didn’t include it in this post because I didn’t want to get unnecessarily long and complicated. If there is anyone who wants me to post that solution I can do an update to this. I would be ever so grateful for feedback, comments or ideas how to improve upon this further
Thanks for reading
Viktor, thank you for this solution, I’ve just implemented it in our einvornment and it’s importing well. I really like how your solutions does not require a service account with the Intune Admin role assigned, which is what I’ve seen in another solution. I’ve added a small menu to the user side script to allow our tech’s to select a group tag from a numbered menu. Will keep you posted if anything else pops up.
I have tried to get this to work, however I am not seeing the device in my AutoPilot. Has anyone run into this issue using this script?
Thanks Viktor this was really helpful. I used this method instead of another one posted online which requires used of an account with the Intune administrator account, which i wanted to avoid. I’ve added a small scripted menu to allow our tech team to select the group tag from a list before the running the script, it’s working great, thanks.
Thanks very much for this Viktor
Would very much appreciate it if you could amend this/add a post with the check to see if the device has already been uploaded into Autopilot if at all possible!
Hello Viktor, thank you very much for sharing.
Your article is the best starting point to webhooks and Azure Automation runbooks an IT guy can wish for.
Kudos!
This worked perfectly for me thanks