Introduction
This stems from what I’ve seen a fair amount of people over on Reddit & Twitter asking about how to solve, the problem is usually along the lines of: “How can I create a user group for all devices that has X app installed?” or “How can I create a group for all users with an Intune device?” and sometimes you can just use an Dynamic Query but then sometimes the query options just isn’t there. So then do we give up and try to find a work around? Add users or devices manually? Of course not. With MS Graph and Azure Automation only Bill’s dreams are the limit
So the solutions I will provide will act as a guideline, you should be able to exchange the properties for whatever fits your needs but in this post I will create a group for one specific purpose and then you can change that to whatever
Solution
I’ve repeated this for almost every post so far on this blog and I’m going to continue to do it when its applicable: there are multiple ways to go about solving an issue and and I’m by no way saying this is the best way to go about it. But I will say this is a quick and easy way to do accomplish your own “dynamic” groups based on whatever properties you want that requires little maintenance. I think there are a few possible solutions to this amongst the EMS bloggers but I’ve not seen one that I can recall
Our goal is to add and remove users to a group based on if they are a primary user for an Intune device (Again this will serve as an example, you can later use the same template to fiddle to your needs, also feel free to comment if you need help)
So to explain what we’re going to do to achieve our goal; We’re going to utilize MS Graph & an Azure Automation account along with an Enterprise Application. The Automation account will run a script on set intervals, depending on how often you want to update you group, and the script will connect to MS Graph using the Enterprise Application to authenticate and then query for the properties we want and then update the Azure AD Group
My last post didn’t contain a lackluster Visio Sketch to visualize the solution so this one surely must:
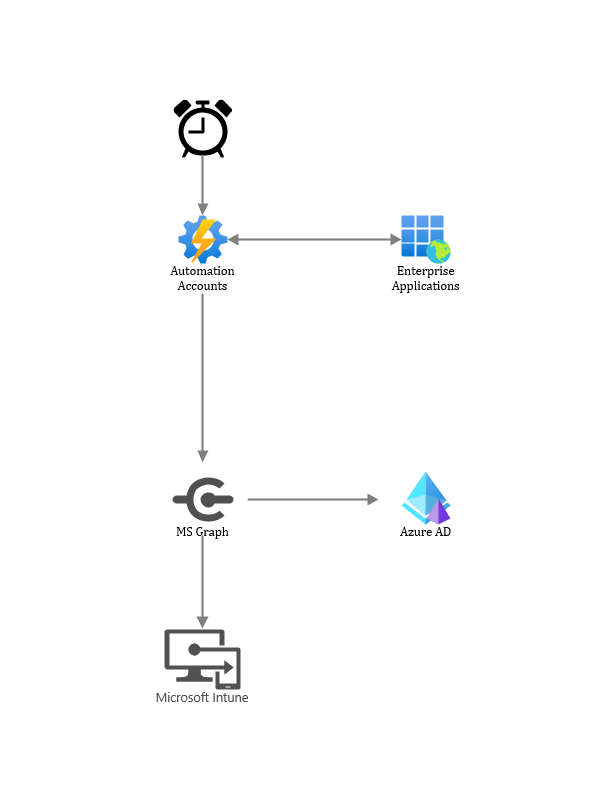
What we need
- An Enterprise Application
- We need to be able to authenticate to MS Graph and the correct API calls
- An Azure AD Group
- This is the group we want to maintain and populate with our Intune Primary Users
- A Script
- The script will be responsible for updating the Azure AD group
- An Azure Automation Account
- This is where we run the script that updates the Azure AD group
See, only a few steps to get going!
Enterprise Application
Firstly we need the Enterprise application, this will be used to authenticate against MS Graph for Intune & Azure AD in order to get our properties and update our membership list
- Open Azure AD
- Navigate to App registrations
- Select New registration
- Select Accounts in this organizational directory only
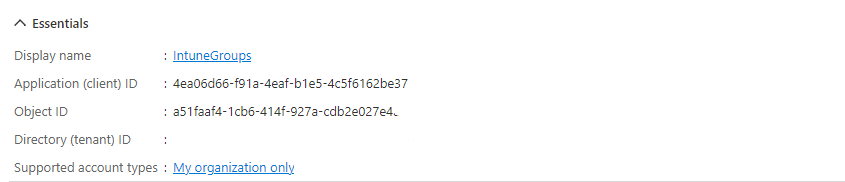
- Select a fitting Name for your application, I chose “IntuneGroups” but it doesn’t matter
- Register
When the Application is finished creating we need to make Note of the Application ID and the Tenant ID visible on the Overview tab
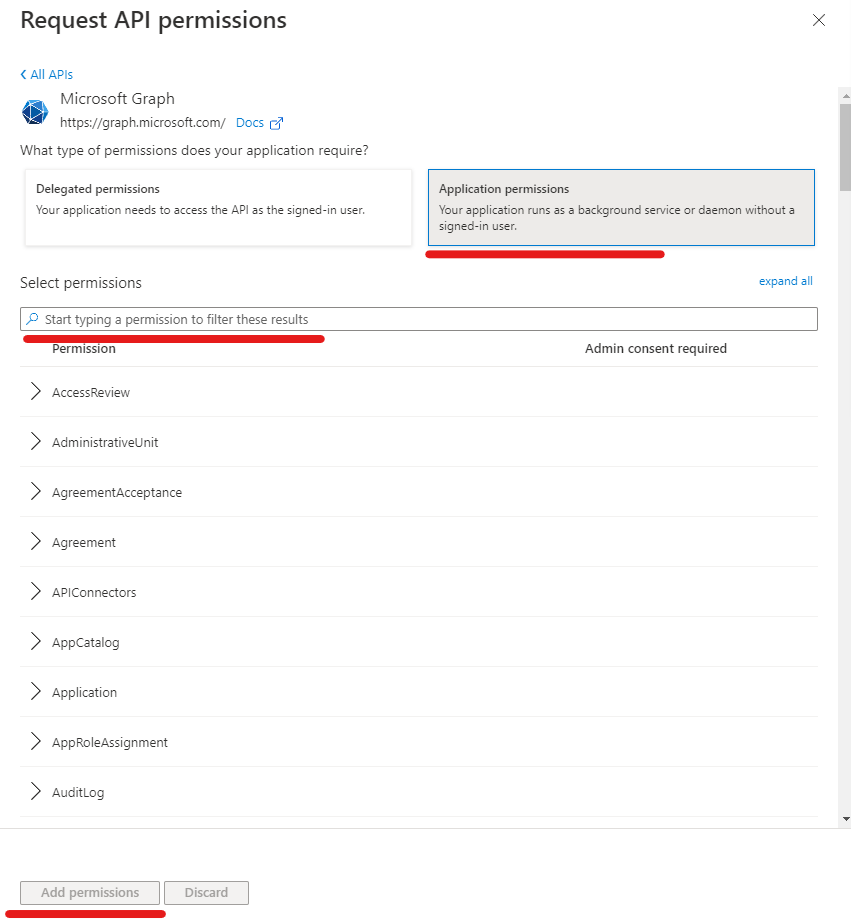
Now we need to assign the permissions we need for the Application to be able to read the information from Intune and update memberships in Azure AD. Navigate to the API permissions tab
- Select Add a permission
- Chose Microsoft Graph
- Chose Application permissions
- Search User.Read.All
- Mark the box for User.Read.All under User
- Repeat for permissions: DeviceManagementManagedDevices.Read.All, GroupMember.ReadWrite.All
- Add permissions
- Review that the correct permissions have been granted then Select Grant admin consent for “Tenant”


Now we just need to create a way for us to authenticate against the Application, navigate to the Certificates & secrets tab
- Make sure you have Client secrets highlighted
- Select New client secret
- Type a descriptive name for the secret and select an expiration, I chose 12 months and entered “IntuneGroups” in the description but it doesn’t matter
- Add
- Make note of the Value, Secret ID, Description & Expiration date
- This will be the only time the Value is visible, after leaving this tab the secret is gone forever
- Enter the information in e.g a Password manager solution for safe keeping
Azure AD Group
So now we’re gonna head into Azure AD to create our group which we aim to maintain using our automation.
- Open Azure AD
- Navigate to the Groups blade
- Select New group
- Select a fitting Name for your group, I chose “Primary Users for Intune Devices” but it depends on what the purpose of your group will be
- Select membership type Assigned
- Select Create
After the group is done creating, head on over to it and make record of the Object ID

Script
Now when we have the Azure AD group in place and the Enterprise Application with the correct permissions we can start to look at the script. Before I provide the script I want to get into how the MS Graph calls work in this scenario and what type of information that can be returned and used to create your groups
So first I’m going to load my variables for the Enterprise Application and some functions to be able to gather a Token as well and do Graph Calls. This will allow me to manually execute calls that retrieve information from Intune before we head on to the fully automated solution. That script will look like this:
|
1 2 3 4 5 6 7 8 9 10 11 12 13 14 15 16 17 18 19 20 21 22 23 24 25 26 27 28 29 30 31 32 33 34 35 36 37 38 39 40 41 42 43 44 45 46 47 48 49 50 51 52 53 54 55 56 57 58 59 60 61 62 63 64 65 66 67 68 69 70 71 72 73 74 75 76 77 78 79 80 81 82 83 84 85 86 87 88 89 90 91 92 93 94 95 96 97 98 99 100 101 102 103 104 105 106 107 108 109 110 111 112 113 114 115 116 117 118 119 120 121 122 123 124 125 126 127 128 129 130 131 132 133 134 135 136 137 138 139 140 141 142 143 144 145 146 147 148 149 150 151 152 153 154 |
############################## # # Viktor Sjögren # https://www.smthwentright.com/ # FileName: XXX.ps1 # ############################## ############################## ## Parameters ############################## ############################## ## Variables ############################## $TenantID = "TENANT ID" $ApplicationID = "ENTERPRISE APPLICATION ID" $AppSecret = 'ENTERPRISE APPLICATION SECRET' ############################## ## Functions ############################## Function Get-MSGraphAuthToken { [cmdletbinding()] Param( [parameter(Mandatory = $true)] [pscredential]$Credential, [parameter(Mandatory = $true)] [string]$tenantID ) #Get token $AuthUri = "https://login.microsoftonline.com/$TenantID/oauth2/token" $Resource = 'graph.microsoft.com' $AuthBody = "grant_type=client_credentials&client_id=$($credential.UserName)&client_secret=$($credential.GetNetworkCredential().Password)&resource=https%3A%2F%2F$Resource%2F" $Response = Invoke-RestMethod -Method Post -Uri $AuthUri -Body $AuthBody If ($Response.access_token) { return $Response.access_token } Else { Throw "Authentication failed" } } Function Invoke-MSGraphQuery { [CmdletBinding(DefaultParametersetname = "Default")] Param( [Parameter(Mandatory = $true, ParameterSetName = 'Default')] [Parameter(Mandatory = $true, ParameterSetName = 'Refresh')] [string]$URI, [Parameter(Mandatory = $false, ParameterSetName = 'Default')] [Parameter(Mandatory = $false, ParameterSetName = 'Refresh')] [string]$Body, [Parameter(Mandatory = $true, ParameterSetName = 'Default')] [Parameter(Mandatory = $true, ParameterSetName = 'Refresh')] [string]$token, [Parameter(Mandatory = $false, ParameterSetName = 'Default')] [Parameter(Mandatory = $false, ParameterSetName = 'Refresh')] [ValidateSet('GET', 'POST', 'PUT', 'PATCH', 'DELETE')] [string]$method = "GET", [Parameter(Mandatory = $false, ParameterSetName = 'Default')] [Parameter(Mandatory = $false, ParameterSetName = 'Refresh')] [switch]$recursive, [Parameter(Mandatory = $true, ParameterSetName = 'Refresh')] [switch]$tokenrefresh, [Parameter(Mandatory = $true, ParameterSetName = 'Refresh')] [pscredential]$credential, [Parameter(Mandatory = $true, ParameterSetName = 'Refresh')] [string]$tenantID ) $authHeader = @{ 'Accept' = 'application/json' 'Content-Type' = 'application/json' 'Authorization' = "Bearer $Token" } [array]$returnvalue = $() Try { If ($body) { $Response = Invoke-RestMethod -Uri $URI -Headers $authHeader -Body $Body -Method $method -ErrorAction Stop } Else { $Response = Invoke-RestMethod -Uri $URI -Headers $authHeader -Method $method -ErrorAction Stop } } Catch { If (($Error[0].ErrorDetails.Message | ConvertFrom-Json -ErrorAction SilentlyContinue).error.Message -eq 'Access token has expired.' -and $tokenrefresh) { $token = Get-MSGraphAuthToken -credential $credential -tenantID $TenantID $authHeader = @{ 'Content-Type' = 'application/json' 'Authorization' = $Token } $returnvalue = $() If ($body) { $Response = Invoke-RestMethod -Uri $URI -Headers $authHeader -Body $Body -Method $method -ErrorAction Stop } Else { $Response = Invoke-RestMethod -Uri $uri -Headers $authHeader -Method $method } } Else { Throw $_ } } $returnvalue += $Response If (-not $recursive -and $Response.'@odata.nextLink') { Write-Warning "Query contains more data, use recursive to get all!" Start-Sleep 1 } ElseIf ($recursive -and $Response.'@odata.nextLink') { If ($PSCmdlet.ParameterSetName -eq 'default') { If ($body) { $returnvalue += Invoke-MSGraphQuery -URI $Response.'@odata.nextLink' -token $token -body $body -method $method -recursive -ErrorAction SilentlyContinue } Else { $returnvalue += Invoke-MSGraphQuery -URI $Response.'@odata.nextLink' -token $token -method $method -recursive -ErrorAction SilentlyContinue } } Else { If ($body) { $returnvalue += Invoke-MSGraphQuery -URI $Response.'@odata.nextLink' -token $token -body $body -method $method -recursive -tokenrefresh -credential $credential -tenantID $TenantID -ErrorAction SilentlyContinue } Else { $returnvalue += Invoke-MSGraphQuery -URI $Response.'@odata.nextLink' -token $token -method $method -recursive -tokenrefresh -credential $credential -tenantID $TenantID -ErrorAction SilentlyContinue } } } Return $returnvalue } ############################## ## Scriptstart ############################## #Authenticate to Enterprise Application $Credential = New-Object System.Management.Automation.PSCredential($ApplicationID, (ConvertTo-SecureString $AppSecret -AsPlainText -Force)) $Token = Get-MSGraphAuthToken -credential $Credential -TenantID $TenantID $ResourceURL = "https://graph.microsoft.com/v1.0/deviceManagement/managedDevices" $managedDevices = Invoke-MSGraphQuery -method GET -URI $resourceURL -token $token -recursive $managedDevices = $managedDevices.Value $managedDevices |
Okay, so it may seem like a lot of lines for something small, the functions are a bit lengthy, just focus on the Variables at the start and the lines at the end
Running the script will output information for all managed devices in our Intune tenant:
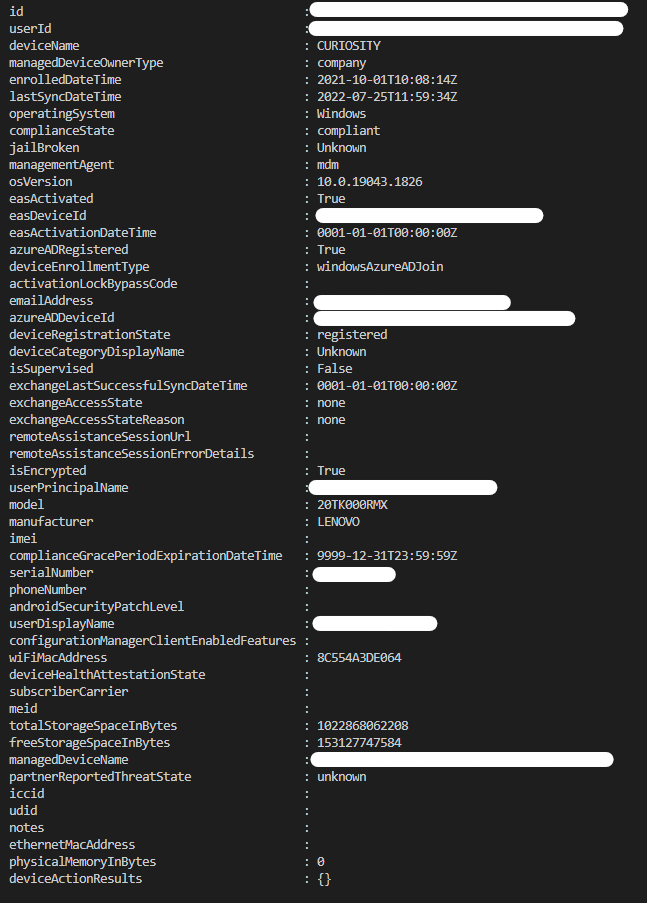
So now it’s getting interesting. Here we can now see the nice properties of a device in Intune that we might want to work with. Unfortunately some of the information is redacted, but we clearly have an attribute for userID that reflects the primary user of the device. This is the property we would like to gather and put into our Azure AD Group. However, before we head into populating our AzureAD we’re gonna go through the API Call
Doing our API call we utilized these lines:
|
1 2 3 4 |
$ResourceURL = "https://graph.microsoft.com/v1.0/deviceManagement/managedDevices" $managedDevices = Invoke-MSGraphQuery -method GET -URI $resourceURL -token $token -recursive $managedDevices = $managedDevices.Value $managedDevices |
So we see the Resource URL is what we’re retrieving information from. That dictates the output of our API call, information about the different API calls for Intune and more information can be found on the Docs

If we take a look at the screenshot above, I’ve highlighted some information.
- Navigation pane
- Here we have highlighted on API call, List under Managed device. List as an API call usually retrieves all Object
- If we go through the navigation pane we can see a lot of other calls such as installed applications and bit locker state and much more!
- HTTP Request
- Here we have the actually address we need to call, this represents our ResourceURL in the short script snippet above
- Prerequisites
- Here Microsoft tells us what permissions we need to grant our Enterprise Application, if you plan on doing another API call than this, make sure your Permissions are updated as well
Right, now we’ve had a look at what type of information is available, how to retrieve it and how to list it so onwards to our script that will gather the Username for each devices in our API call for all devices and then put into our Azure AD group
|
1 2 3 4 5 6 7 8 9 10 11 12 13 14 15 16 17 18 19 20 21 22 23 24 25 26 27 28 29 30 31 32 33 34 35 36 37 38 39 40 41 42 43 44 45 46 47 48 49 50 51 52 53 54 55 56 57 58 59 60 61 62 63 64 65 66 67 68 69 70 71 72 73 74 75 76 77 78 79 80 81 82 83 84 85 86 87 88 89 90 91 92 93 94 95 96 97 98 99 100 101 102 103 104 105 106 107 108 109 110 111 112 113 114 115 116 117 118 119 120 121 122 123 124 125 126 127 128 129 130 131 132 133 134 135 136 137 138 139 140 141 142 143 144 145 146 147 148 149 150 151 152 153 154 155 156 157 158 159 160 161 162 163 164 165 166 167 168 169 170 171 172 173 174 175 176 177 178 179 180 181 182 183 184 185 186 187 188 189 190 191 192 193 194 195 196 197 198 199 200 201 202 203 204 205 206 207 208 209 210 211 212 |
############################## # # Viktor Sjögren # https://www.smthwentright.com/ # FileName: XXX.ps1 # ############################## ############################## ## Parameters ############################## ############################## ## Variables ############################## $TenantID = Get-AutomationVariable -Name TenantID $ApplicationID = Get-AutomationVariable -Name IntuneGroupsApplicationID $AppSecret = Get-AutomationVariable -Name IntuneGroupsAppSecret $AADGroupID = Get-AutomationVariable -Name PrimaryUsersID ############################## ## Functions ############################## Function Get-MSGraphAuthToken { [cmdletbinding()] Param( [parameter(Mandatory = $true)] [pscredential]$Credential, [parameter(Mandatory = $true)] [string]$tenantID ) #Get token $AuthUri = "https://login.microsoftonline.com/$TenantID/oauth2/token" $Resource = 'graph.microsoft.com' $AuthBody = "grant_type=client_credentials&client_id=$($credential.UserName)&client_secret=$($credential.GetNetworkCredential().Password)&resource=https%3A%2F%2F$Resource%2F" $Response = Invoke-RestMethod -Method Post -Uri $AuthUri -Body $AuthBody If ($Response.access_token) { return $Response.access_token } Else { Throw "Authentication failed" } } Function Invoke-MSGraphQuery { [CmdletBinding(DefaultParametersetname = "Default")] Param( [Parameter(Mandatory = $true, ParameterSetName = 'Default')] [Parameter(Mandatory = $true, ParameterSetName = 'Refresh')] [string]$URI, [Parameter(Mandatory = $false, ParameterSetName = 'Default')] [Parameter(Mandatory = $false, ParameterSetName = 'Refresh')] [string]$Body, [Parameter(Mandatory = $true, ParameterSetName = 'Default')] [Parameter(Mandatory = $true, ParameterSetName = 'Refresh')] [string]$token, [Parameter(Mandatory = $false, ParameterSetName = 'Default')] [Parameter(Mandatory = $false, ParameterSetName = 'Refresh')] [ValidateSet('GET', 'POST', 'PUT', 'PATCH', 'DELETE')] [string]$method = "GET", [Parameter(Mandatory = $false, ParameterSetName = 'Default')] [Parameter(Mandatory = $false, ParameterSetName = 'Refresh')] [switch]$recursive, [Parameter(Mandatory = $true, ParameterSetName = 'Refresh')] [switch]$tokenrefresh, [Parameter(Mandatory = $true, ParameterSetName = 'Refresh')] [pscredential]$credential, [Parameter(Mandatory = $true, ParameterSetName = 'Refresh')] [string]$tenantID ) $authHeader = @{ 'Accept' = 'application/json' 'Content-Type' = 'application/json' 'Authorization' = "Bearer $Token" } [array]$returnvalue = $() Try { If ($body) { $Response = Invoke-RestMethod -Uri $URI -Headers $authHeader -Body $Body -Method $method -ErrorAction Stop } Else { $Response = Invoke-RestMethod -Uri $URI -Headers $authHeader -Method $method -ErrorAction Stop } } Catch { If (($Error[0].ErrorDetails.Message | ConvertFrom-Json -ErrorAction SilentlyContinue).error.Message -eq 'Access token has expired.' -and $tokenrefresh) { $token = Get-MSGraphAuthToken -credential $credential -tenantID $TenantID $authHeader = @{ 'Content-Type' = 'application/json' 'Authorization' = $Token } $returnvalue = $() If ($body) { $Response = Invoke-RestMethod -Uri $URI -Headers $authHeader -Body $Body -Method $method -ErrorAction Stop } Else { $Response = Invoke-RestMethod -Uri $uri -Headers $authHeader -Method $method } } Else { Throw $_ } } $returnvalue += $Response If (-not $recursive -and $Response.'@odata.nextLink') { Write-Warning "Query contains more data, use recursive to get all!" Start-Sleep 1 } ElseIf ($recursive -and $Response.'@odata.nextLink') { If ($PSCmdlet.ParameterSetName -eq 'default') { If ($body) { $returnvalue += Invoke-MSGraphQuery -URI $Response.'@odata.nextLink' -token $token -body $body -method $method -recursive -ErrorAction SilentlyContinue } Else { $returnvalue += Invoke-MSGraphQuery -URI $Response.'@odata.nextLink' -token $token -method $method -recursive -ErrorAction SilentlyContinue } } Else { If ($body) { $returnvalue += Invoke-MSGraphQuery -URI $Response.'@odata.nextLink' -token $token -body $body -method $method -recursive -tokenrefresh -credential $credential -tenantID $TenantID -ErrorAction SilentlyContinue } Else { $returnvalue += Invoke-MSGraphQuery -URI $Response.'@odata.nextLink' -token $token -method $method -recursive -tokenrefresh -credential $credential -tenantID $TenantID -ErrorAction SilentlyContinue } } } Return $returnvalue } ############################## ## Scriptstart ############################## #Authenticate to Enterprise Application $Credential = New-Object System.Management.Automation.PSCredential($ApplicationID, (ConvertTo-SecureString $AppSecret -AsPlainText -Force)) $Token = Get-MSGraphAuthToken -credential $Credential -TenantID $TenantID #Get all managed devices $ResourceURL = "https://graph.microsoft.com/v1.0/deviceManagement/managedDevices" $managedDevices = Invoke-MSGraphQuery -method GET -URI $resourceURL -token $token -recursive $managedDevices = $managedDevices.Value #Get all members in our current AAD groups to later be used to compare $ResourceURL = "https://graph.microsoft.com/beta/groups/$AADGroupID/members" $GroupMembers = Invoke-MSGraphQuery -method GET -URI $resourceURL -token $token -recursive $GroupMembers = $GroupMembers.Value Write-Output "$($GroupMembers.count) members in AAD Group" #Removing duplicates and Empty objects $SortedObjects = @() ForEach ($Device in $managedDevices) { #Remove if Device has no Primary User If ([string]::IsNullOrEmpty($Device.userID)) { Write-Output "Skipping due to Empty InputObject" ; Continue } #Remove if user is already in collection If ($SortedObjects -contains $Device.userID) { Write-Output "Skipping due to InputObject already exists in collection" ; Continue } $SortedObjects += $Device.userId } If ([string]::IsNullOrEmpty($GroupMembers.ID)) { $Temp = New-Object System.Object ; $Temp | Add-Member -MemberType NoteProperty -Name "ID" -Value "Temp"; $GroupMembers += $Temp } #Compare the current group members againt our attirubte list $Compare = Compare-Object -ReferenceObject $GroupMembers.ID -DifferenceObject $SortedObjects #Add the users to the group ForEach ($User in $Compare) { $UserID = $User.InputObject #If User is no longer amongst primary intune users but in the group it needs to be removed If ($User.SideIndicator -eq "<=") { Write-Output "Removing User with ID $UserID" Try { $ResourceURL = "https://graph.microsoft.com/v1.0/groups/$AADGroupID/members/$UserID/`$ref" $RemoveUser = Invoke-MSGraphQuery -method DELETE -URI $resourceURL -token $token -Body $body } Catch { Write-Output "Error occured with removing user ID: $UserID" } } #If the user is not in the group but is a primary intune user it needs to be added If ($User.SideIndicator -eq "=>") { Write-Output "Adding User with ID $($UserID)" $Body = @{ "@odata.id"="https://graph.microsoft.com/v1.0/directoryObjects/$UserID" } | ConvertTo-Json Try { $ResourceURL = "https://graph.microsoft.com/v1.0/groups/$AADGroupID/members/`$ref" $AddUser = Invoke-MSGraphQuery -method POST -URI $resourceURL -token $token -Body $body } Catch { Write-Output "Error occured with adding user ID: $UserID" } } } |
Automation Account
Onwards to the next part in our solution, the Automation Account. The Automation Account will add Azure capacity and therefore cost, however, Automation includes 500 minutes of free processing time and we will be able to use those to not add cost depending on how often you want to run your scripts. If you want to know more about costs in Azure feel free to check it out using Azure Calculator
First we’re going to start by creating our Automation Account that will house our script. If you already have an Automation Account feel free to use that and skip this bit
Creating the Automation Account
- Start off by searching for Automation Account in Azure
- Select Create
- Chose a fitting Subscription, Resource Group, and Region
- Select a fitting Name for your Automation Account, I chose “IntuneAutomation” but it doesn’t matter
- For Managed Identities’ we can uncheck both boxes
- Under Networking you can chose whatever supports your infrastructure, recommended to have Private Access but for this instance I chose “Public Access”
- Go through the rest of the tabs at your own preference and then Create
When the Automation Account is finished creating we can now head into it to Upload our Script & Create our Variables
So first we’re gonna create our Variables for the script, one of the cool things about an Automation Account is you can create variables for your script Outside of the script and then import that variable into any script in your Automation Account. So that’s what we’re gonna start off doing with our Enterprise Application information
- Select the blade Variables
- Select Add a variable
- Now we get to name our Variable, this name must reflect the name of the Variable we import in the script. You can chose differently from what I chose as long as you update those values in the Script.
- Enter the name TenantID and the type String and the Value we collected earlier
- Enter the name IntuneGroupsApplicationID (or another fitting prefix for your ApplicationID, but if you change this it must be changed in the script as well) variable and the type String and the Value we collected earlier
- Enter the name IntuneGroupsAppSecret (or another fitting prefix for your AppSecret, but if you change this it must be changed in the script as well) variable and the type String and the Value we collected earlier, on this Variable chose Encrypted “Yes“
So thats the Enterprise Application variables added, now we just need a variable for the Azure AD Group, we made note of the Object ID earlier
- Select Add a variable
- Enter the name PrimaryUsersID (or another fitting prefix for your Azure AD Group, but if you change this it must be changed in the script as well) and the type String and the Object ID we collected earlier

Now with our Variables done we can head onto uploading the script.
- Select the blade Runbooks
- Select Create a runbook
- Select a fitting Name for your Automation Account, I chose “ManageIntuneGroup-PrimaryUsers” but it doesn’t matter
- For Runbook type select Powershell and for Runtime version select 5.1 (As the time of writing this 7.1 is still in preview and untested by me but if you want to use 7.1 it will probably work just as well), Enter any description you want then select Create
- When faced with the blank canvas we can now paste in our script, we do not need to change anything since the variables that we normally would need to change will be imported from the Automation Account unless you made changes to the Variable names
- Save & Publish
Okey so we’re almost there. The last piece of the puzzle is to link the script to a schedule. When you saved your script you should be on the overview page of your runbook

- Select Link to schedule
- Select Schedule
- Select Add a schedule
- Select a fitting Name for your Schedule, I chose “ManageIntuneGroup-PrimaryUsers-1H” but it doesn’t matter
- Add a fitting description
- Select a start time, preferable now or wait if you want to start at a later date
- Select Recurring
- Chose how often you want to run it, in this example I chose Recury every 1 hour but it depends on your needs
- I chose no expiration, but depends on your needs
- Select Create
- Select Parameters
- Select OK
- Select OK again
You should now see that the runbook is linked to a Schedule if you navigate to the Schedule blade

Trying it out
Trying it out is really simple, you can wait for the first run or you can head to the overview page and hit Start to run it now
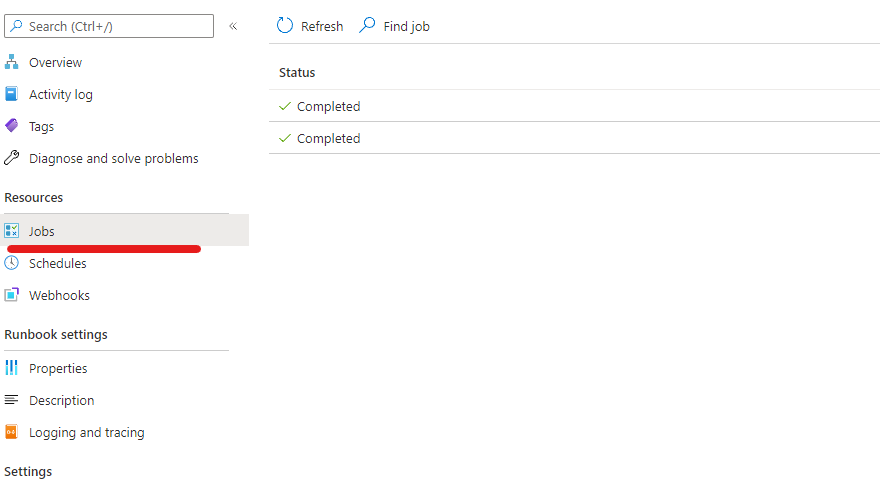
Select the blade Jobs in your Automation Account and you should see it as Completed or Running, hopefully not failed. If you enter the Job you can view the logs and see what’s going on. Once you clicked on the Job you can select the All Logs tab and the table shows all the details
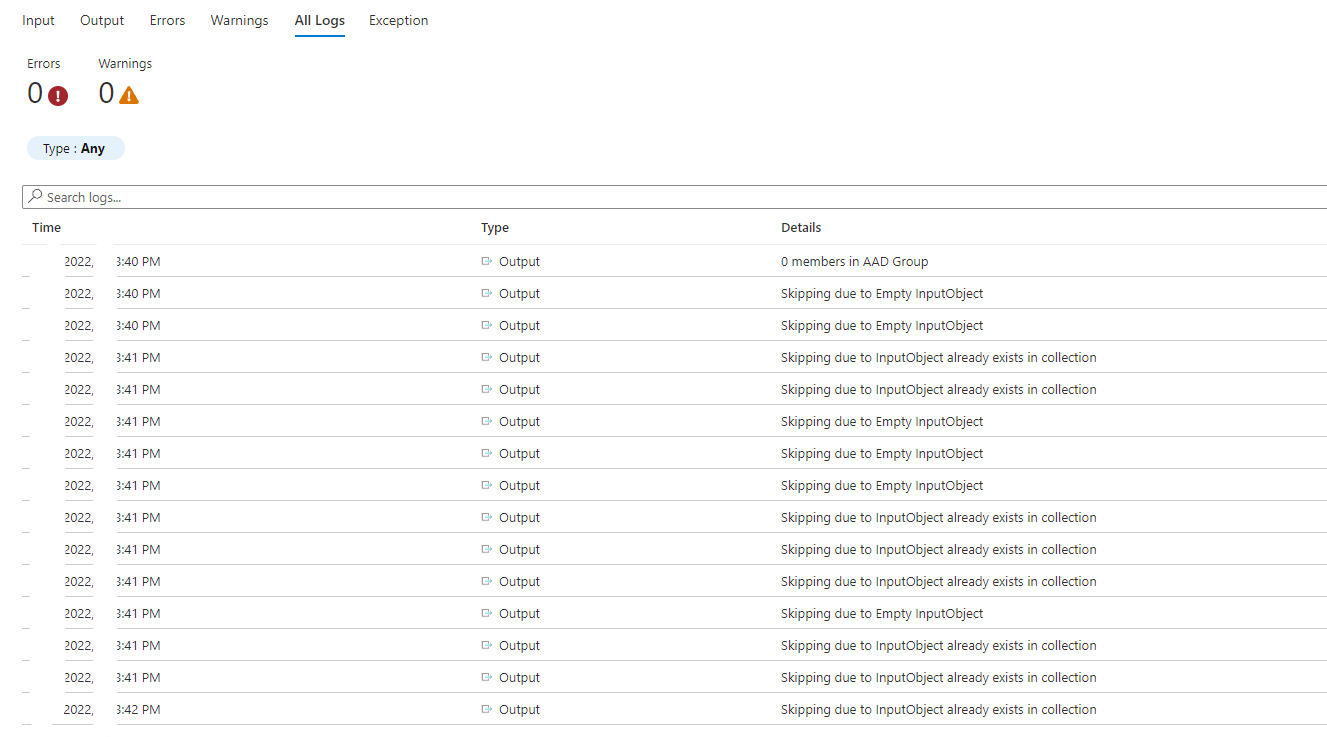
After the job is run you should see your Azure AD group getting populated!
Done!
Further
As always I would love if anyone comes up with ways to improve this. I think the ways to improve upon this are many! I also think there are a lot of great idea that people come up with using a solution like this, creating many different type of groups for different purposes, I’d love if people wanted to share. If there is anyone who wants me to post that solution I can do an update to this. I would be ever so grateful for feedback, comments or ideas how to improve upon this further
Thanks for reading
I appreciate the detail and accuracy in this article. I was able to follow along but what I’m really looking to accomplish with Intune is a dynamic group based on a registry value (thinking application installed). I’m having trouble seeing how I can adjust this information to have it poll my devices for an installed app/reg key value.
Just a heads up here. This will not give you the primary users but “Enrolled by”.
https://graph.microsoft.com/beta/devices/{AZUREADDEVICEID}/registeredOwners
Will return the primary user and return blank if nothing is set.
How can you add a filter on the script that will only display OperatingSystem Apple or Android?
How can you filter by operating system?